Home
>
PDF Tips
>
How to Change Text in Image on Desktop, Mobile, and Free Online
Home
>
PDF Tips
>
How to Change Text in Image on Desktop, Mobile, and Free Online
How to Change Text in Image on Desktop, Mobile, and Free Online
- 1 Three file types need three different methods: layered (PSD, AI), raster (JPG, PNG, screenshots), and scanned (PDF or photo) --- pick the tool that matches your file.
- 2 For JPG, PNG, and screenshots where formatting has to match, use an OCR tool like PDNob PDF Editor --- it auto-detects font, size, and color in one pass.
- 3 MS Paint and iOS Markup are free workarounds, but they only work on solid-color backgrounds. For textured or busy backgrounds, use an OCR-based replacement tool.
- 4 For the cleanest edit, get the source PSD and use Photoshop --- every kerning, ligature, and layer effect stays intact.
- 5 For casual, no-install edits, online free AI image editors like Pixelbin.io can handle text replacement in minutes, free.
You've probably been there: a screenshot with a price to update, a meme to remix, or a poster with a typo. The question is always the same—how do I change the text in image without redoing the whole design? The answer depends on your file type, your device, and whether you need pixel-perfect formatting or just the words changed.
This guide covers seven methods that work in 2026, from a 10-second AI fix in PDNob to a free browser workflow in onlien AI image editor. Whether your image is a flat JPG, a layered PSD, or a PDF, you'll find a method that fits your skill level and budget.

Part 1. Options on Methods to How to Change Text in Images
Can You Actually Change Text on Any Image?
The short answer to 'can I change text on an image' is : yes, but how easy it is depends on the file format.
- Layered files (PSD, AI, INDD, layered PDF) keep text as real, clickable characters. Double-click the text layer and edit it like in Word.
- Raster files (JPG, PNG, screenshot) have no editable text. The letters are just pixels, so you need a tool that can match the font, size, and color and repaint the area.
- Scanned documents (scanned PDFs, photos of contracts) are images with text baked in. They require OCR first, then editing.
Quick Comparison: Which Method Should You Pick
Before you dive in, run through this 10-second decision. The first column tells you when each method actually fits; the rest shows what you'd be using.
 Please swipe to view
If your file is a JPG or PNG and the formatting matters, jump to Part 2 --- that's where AI tools like PDNob shine because they preserve the original font, size, and color without manual matching.
Part 2. How to Change Text in an Image on Desktop
Desktop workflows give you the most control. The right one depends on your file type and how much formatting fidelity you need.
2.1 How to Edit Text in a JPG Image
JPG files have no text layer, and the hardest part is matching font, size, color, weight, spacing, and anti-aliasing. That's the gap PDNob's OCR engine fills.
PDNob PDF Editor is a desktop-based PDF editor built for fast response and AI high-precision OCR. It opens documents instantly and uses AI high-precision OCR to recognize text across scanned PDFs and raster images, letting users edit text in image files while keeping the original font, size, and color --- perfect for handling screenshots, scanned contracts, and marketing images where formatting has to match. When you open a JPG, PNG, or scanned PDF in PDNob PDF Editor, the engine reads the existing characters, identifies the font style, and preserves the size, color, and weight when you retype. You don't pick fonts from a dropdown --- the tool matches them automatically, and you confirm or fine-tune in a side preview.





For keeping the same formatting specifically, the workflow is:
-
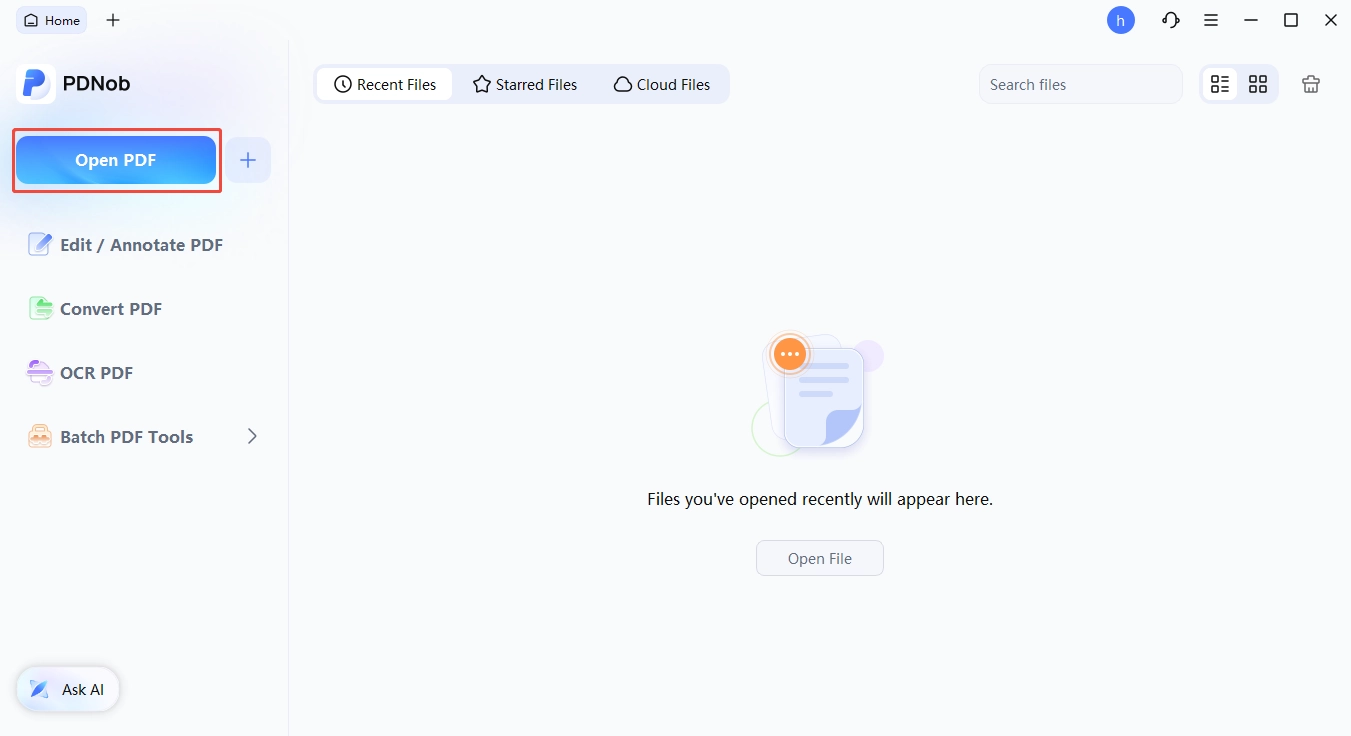
Open PDNob PDF Editor and click Open to load your JPG, PNG, or scanned PDF.
-
Click Edit PDF in the top toolbar; OCR runs automatically and detects text regions on image-based pages.
-
Click any text block to see its detected font, size, color, and weight, then type the new text --- the original font and color are preserved automatically.
Adjust if needed, and save or export as JPG, PNG, or PDF.


What makes this faster than Photoshop for most users: you don't open a font dropdown, you don't sample colors with an eyedropper, and you don't manually match kerning. The OCR pass does it in one shot. For users who need to edit text in image files (especially scanned PDFs, screenshots, or marketing images) without learning Photoshop, this is the shortest path from problem to done.
Pros
- OCR engine preserves original font, size, and color automatically
- Works across desktop and cloud workflows --- no "cloud dependency" lock-in
- 0.25s cold start --- fastest in its class
- Handles scanned PDFs, JPG, PNG, and screenshots in one tool
Cons
- Free tier has limits on batch processing and certain advanced tools
- PC-focused; online version available but feature parity varies
2.2 How to Edit Text in Photoshop
Adobe Photoshop is the gold standard when you have the source PSD file and need to keep every kerning, ligature, and effect intact. It's also the slowest and most expensive path.
Guide on How to Edit Photoshop Text
Option A: If you have the source PSD:
-
Open the file in Photoshop and find the text layer in the Layers panel (look for the T icon).
-
Double-click the T to enter edit mode, retype your text, and press Ctrl+Enter (Windows) or Cmd+Enter (Mac) to commit.
-
All layer effects --- drop shadow, gradient overlay, stroke --- stay in place automatically, making this the cleanest way to edit text in PSD without re-rendering anything.
Option B: If you only have a flattened JPG or PNG
-
Use the Eyedropper Tool (I) to sample the exact color of the original background, then use a Rectangle Tool or Pencil tool to cover the text you need to change.
-
Use the Type Tool (T) to type new text on a new layer. Match the font as closely as possible.
-
Use Free Transform (Ctrl+T) to scale the text to match the original's size in pixels.
-
Use a layer mask and the Clone Stamp (S) to blend any anti-aliasing seams on textured backgrounds.


Pros
- Pixel-perfect control over typography and effects
- Industry-standard for designers
- Supports PSD, AI, and PDF source files
- Generative Fill speeds up rasterized edits
Cons
- Steep learning curve for non-designers
- Subscription cost --- overkill if you only edit text occasionally
- Manual font matching eats 10--20 minutes per image
- Generative Fill output requires manual cleanup
Photoshop's Generative Fill (introduced 2023, expanded 2024) can also rewrite text regions using AI. The output is good for clean backgrounds but still needs human review for color and kerning.
2.3 How to Edit Text in Paint (MS Paint Workaround)
MS Paint can't truly edit text inside an image --- it can only cover old text with a colored shape and retype new text on top. But for solid-color backgrounds (screenshots of UI, white-background receipts, flat-color posters), it's surprisingly fast.

-
Open the image in Paint. Use the Rectangle Select tool to select the text region.
-
Use the Color Picker of Paint to pick the color of adjacent area, and fill the rectangle you created to match the background.
-
Pick the Text tool (A), click on the cleared area, and type the new text.
-
Change the font, size, and color using the toolbar; drag the text box to align with surrounding elements.
Pros
- Free and built into every Windows PC
- Zero learning curve
- Fast on solid-color backgrounds
Cons
- No font matching --- manual eyeballing required
- Visible patch on textured backgrounds
- No layer support --- every edit is destructive
- No OCR --- you must know what the text originally said
This workflow breaks the moment the background has any texture, gradient, or noise --- the rectangular patch will be obvious. For textured backgrounds, use GIMP or other professional image editor instead.
2.4 Add Text to Picture in Word
Microsoft Word isn't a dedicated image editor, but if your text lives inside a Word document (a report, a flyer, a contract), Word is the most natural place to add or replace captions on embedded pictures. This is also where the "add text to picture in Word" search intent lives --- usually a user who wants their caption inside a .docx file, not a standalone image.
-
In your Word document, click the image to select it, then go to Insert →Drawing→ Image → Text Box.
-
Draw a text box over the area where you want to cover old text.
-
Right-click the text box → Shape Fill → Pick the background color as Fill and Outline color so only the old text can be naturally covered.
-
Type the new text and use the Home tab to match font, size, color, and alignment --- if it sits on a colored area, use Word's eyedropper or a matching hex value for the background tone.


Pros
- Already in your workflow if you're writing in Word
- Familiar font and paragraph controls
- Saves directly to .docx without exporting
Cons
- Text boxes float on top of images --- no real editing
- Manual color matching for backgrounds
- No OCR or layered editing
- Cannot export the modified image as a clean JPG
For full image editing inside Word, the limits show up fast: Word's text box doesn't blend with image backgrounds, multi-line alignment is manual, and there's no clone-stamp. For anything beyond a flat caption, use a real image editor.
Part 3. How to Change Text in an Image on Mobile
Most "edit text in image" tasks land on mobile these days --- screenshots from your phone, memes for social, captions for Instagram Stories. The trick is knowing which app actually edits text vs which one just lets you draw on top.
3.1 How to Edit Text in Image on iPhone
iOS Markup --- the built-in editor in the Photos app --- is the fastest starting point, since it's free and already on every iPhone. It only adds overlays, so it works on solid-color backgrounds. For textured backgrounds, you need an OCR-based replacement tool --- see Part 4 for a free browser-based option.

-
Open the image in Photos, tap Edit, then tap the Markup icon:
-
Use the Brush or Rectangle tool to cover the existing text with a color matching the background --- pure white on white, dark gray on darker ones.
-
Tap the + button at the bottom-right, choose Text, and type your new text; drag and pinch to resize until it lines up with surrounding elements
-
Tap Done to save --- Photos keeps the original and stores Markup's edit as a copy in your library.
3.2 How to Edit Text in Image on Android
Android doesn't have a native editor as capable as iOS Markup. The fastest path is a third-party replacement app like PhotoRoom or SnapEdit --- they auto-detect the text region, match the original font and color, and let you retype in one screen. Install one from Google Play and follow the steps below:

Open the image in Google Photos, tap Edit, then tap the Markup icon (or the pencil icon, depending on your version)
-
Use the Pen or Highlighter tool to cover the existing text with a color matching the background --- pure white on white, dark gray on darker ones. (Google Photos has no rectangle shape, so a thick pen stroke works best.)
Tap the Text tool (the "T" icon), type your new text, then drag and pinch to resize and reposition it until it lines up with surrounding elements.
-
Tap Done to save --- Google Photos keeps the original and stores the edit as a copy in your library.
If your Android task is editing text inside a scanned PDF or a multi-page document, do it on a desktop instead --- mobile screens aren't built for cross-page text matching.
Part 4. How to Change Text in a Free Online AI Image Editor
Free workflows work if your edit is casual and your file is forgiving. The free AI route that holds up best in 2026 is the one below.
4.1 How to Edit Image Text in Pixelbin.io
Pixelbin.io image-editor is the fastest free path for editing text in a picture: type a prompt like "replace the price from $99 to $79" and the AI rewrites the text inside the image, matching font and color automatically. No Photoshop, no overlay hacks, no manual font matching.
Steps Guide on Edit Image Text in Pixelbin.io
-
Open Pixelbin AI Image Editor in your browser and upload your JPG, PNG, or screenshot.
-
In the prompt box, describe the change in plain English. The AI detects the text region, identifies the original font and color, and regenerates the area with the new text.
-
Review the preview; if it isn't a clean match, refine the prompt (e.g., "match the font weight more closely") or pick a different style preset.
Download the result as PNG or JPG.


Pixelbin's prompt-based workflow is genuinely different from traditional canvas text editors that just overlay new text on top --- it actually rewrites the text inside the image, so it works on textured backgrounds where overlay methods break.
Conclusion
Changing text in an image no longer means starting the whole design over. The right method comes down to three things: your file type, your device, and how much formatting fidelity you need. For layered PSD or AI files, Photoshop remains the cleanest option. For flat JPGs, PNGs, and screenshots, OCR-based tools like PDNob handle font, size, and color matching in one pass. On mobile, iOS Markup and Google Photos work fine for solid backgrounds, while Pixelbin.io offers a free, prompt-based AI alternative that handles textured images. Pick the tool that matches your file and skill level, and you can replace any text in minutes.
FAQ on How to Change Text in Image
Q1. Can you change text on an image?
A1: Yes, in every common case. For layered files like PSD, you can edit the text layer directly in Photoshop or any compatible editor. For flat files like JPG, PNG, and screenshots, the text becomes pixels and needs an AI replacement tool or a manual clone-stamp workflow to repaint. For scanned PDFs and document photos, OCR first, then edit.
Q2. Can I edit text within a JPG image?
A2: Not directly --- JPG has no text layer. The text you see is just colored pixels. To change it, you need a tool that either repaints the pixels with new text matching the original style, or overlays new text on top (only works on solid backgrounds). PDNob, Hama, and similar AI editors handle this in 60--90 seconds.
Q3. How can I replace text in an image for free?
A3: Photopea.com (browser-based, no install, supports PSD layers), GIMP (open-source desktop), and PicFont's free tier (mobile) all handle text replacement at no cost. The tradeoffs: free tiers often add watermarks, limit daily uses, or downscale output. For occasional edits this is fine; for regular work, a paid tool is faster.
Q4. How do I text a picture on iPhone?
A4: iOS Markup only adds overlays, not real edits. For actual text replacement on iPhone, install PicFont or use the iOS version of PDNob. Both let you tap a text region, type the replacement, and save --- PicFont for quick social edits, PDNob for PDF or scanned-document work.
Q5. How to edit text in an image keeping the same formatting?
A5: The fastest way is to use an AI tool with OCR that auto-detects font, size, and color --- PDNob PDF Editor does this, and so does Hama. If you have to do it manually, sample the color with an eyedropper, identify the font with Font Squirrel Matcherator or Whatfont, measure the original text height in pixels, and retype with matched values. Manual matching takes 10--20 minutes per image.
Q6. What does "editable images" mean?
A6: An "editable image" usually refers to a layered file (PSD, AI, INDD, layered PDF) where text, shapes, and effects are separate, clickable elements. Flat JPG and PNG files are NOT editable in this sense --- only repaintable. When you see "editable image" in design contexts, the file format is almost always PSD or AI.



- Make scanned PDFs searchable and editable with 99% OCR precision
- Batch convert PDFs to Word, Excel, PPT, images, PDF/A, Text, EPUB, etc., up to 30% faster
- Edit PDFs easily like Word, including text, images, watermarks, links, and backgrounds
- Annotate PDF with highlights, comments, shapes, stickers, and stamps
- Run smoothly on any PC without lags or crashes, even on low-spec machines
 Secure Download
Secure Download
Speak Your Mind
then write your review
Speak Your Mind
Leave a Comment
Create your review for PDNob articles
Related articles

AI Tools Writer / Workflow Analyst
Rachel has spent the last 5 years testing and writing about AI-powered tools across writing, design, and research workflows. She focuses on practical AI tool usage, helping knowledge workers turn generative AI into everyday productivity.