How to Use New Canva Magic Layers: Fast Edits & NotebookLM Tips
Canva's AI-powered design tools continue to evolve, and the new Magic Layers feature represents one of the most significant updates for designers who need to transform static images into editable, multi-layered compositions. Whether you're creating social media graphics, marketing materials, or infographics, understanding how to use new magic layers in canva can dramatically streamline your workflow.
This comprehensive canva magic layers tutorial covers everything you need to know about canva layers, from accessing the feature to practical applications and important limitations you should understand before diving in.
Part 1. What is Canva Magic Layers: Features, File Types & Limitations
To truly understand how to use new Magic Layers in Canva, you must first grasp what it is and isn't. Think of traditional Canva layers as transparent sheets you manually stack. Canva Magic Layers is the intelligent evolution: an AI-driven system that understands the content of your images and text, enabling sophisticated in teractions with intuitive commands.

Core Capabilities: What You Can Do With Magic Layers
- Smart Subject Isolation: Automatically detect and separate foreground subjects (people, products) from backgrounds.
- Dynamic Element Integration: Make text and shapes appear to weave behind or through image subjects.
- Streamlined Complex Composites: Create multi-layered designs without complex clipping masks.
- Background Preservation: Unlike Background Remover which discards the background entirely, Magic Layers keeps it as an independently movable element you can reposition, blur, or replace.
Supported File Types & Requirements
Magic Layers works with the following file types:
- JPEG – Best for photographs with clear subject-background contrast.
- PNG – Works well; original transparency may affect separation.
- WEBP – Supported, results vary based on compression.
- HEIC – Supported when uploaded from iOS devices.
Requirement: Canva Pro, Teams, Education, or Nonprofit account—Magic Layers is not available on the free plan.
Limitations to Understand
- Text-heavy images produce unreliable results: Small fonts, decorative typefaces, or low-contrast text often appear with missing characters, gaps, or blurring.
- Optimal Conditions: Works best with high-contrast, well-lit images.Complex edges like hair or fur may look rough.
- No manual refinement: Unlike professional software like Photoshop, you cannot manually adjust what the AI separates or refine selection edges. What the AI produces is what you work with.
- Single images only: Magic Layers processes one image at a time and does not work with multi-page documents or PDFs.
- Limited file size support: Very small images (under 200px) or heavily compressed files may produce poor separation results.

For projects that fall outside these ideal conditions—especially those involving text-heavy graphics, scanned documents, or multi-page files—you may find Magic Layers frustrating to work with. In those cases, tools like PDNob PDF Editor, which specializes in OCR and text extraction, can fill the gap effectively.


Part 2. How to Use New Magic Layers in Canva (Step-by-Step)
Mastering how to use new magic layers in canva is simpler than it might seem. This walkthrough covers the essential steps from start to finish.
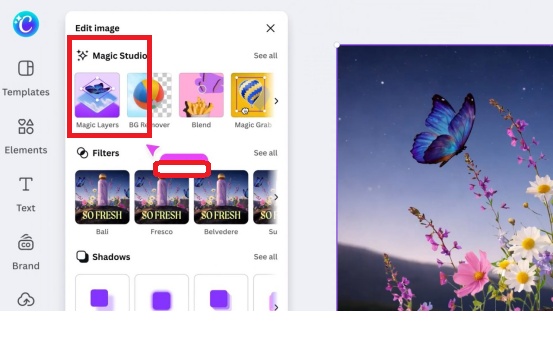
How to Access Layers in Canva
To find Magic Layers, click “Home” in the toolbar, you see “Magic Layers” . Click it, and within seconds, your image becomes separate, movable layers.

Canva Magic Layers Tutorial
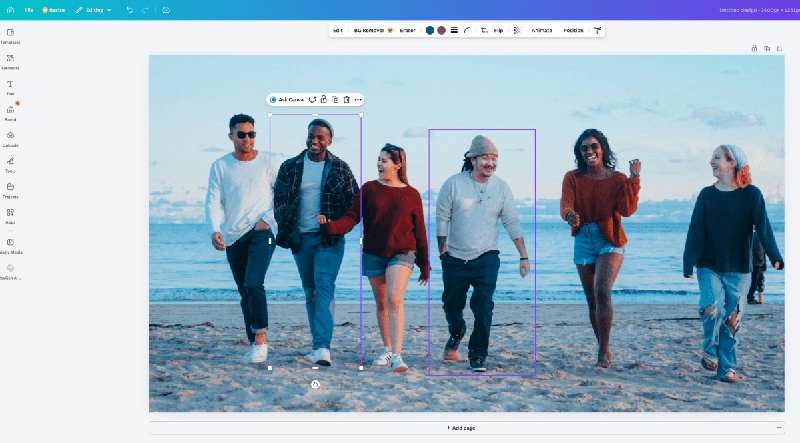
- Pick a Compatible Image: Images where the subject stands out clearly from the background—like a person against a plain wall or a product on a white surface—yield the cleanest separation.
-
Apply Magic Layers: With your image selected, click “Edit
image” > “Magic Layers.” Wait 3–5 seconds for processing to complete.
-
Work with Your Separated Layers: Once processed, click
different parts of the image to select individual layers. You can drag to
reposition, resize, or apply effects to each layer independently.
- Add Elements Between Layers: This is where the magic happens. Add text or graphics, then use the layers panel (Ctrl/Cmd + Shift + L) to drag them between your subject and background layers. Text can now visually sit behind a person while staying in front of the background.
-
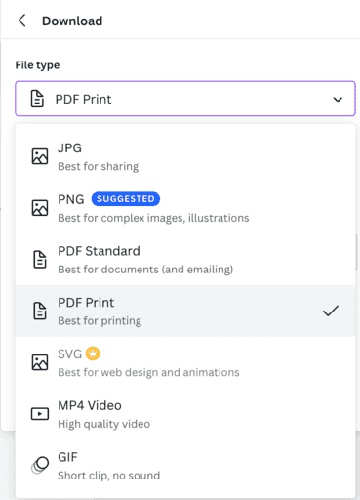
Finalize and Export: Adjust stacking order, lock layers you
don’t want to move, and export your design as PNG, JPG, or PDF. Remember
that all layers flatten into a single image upon export.


Now that you've mastered the core steps, you can apply Magic Layers' powerful editing capabilities to any image. For example, quickly optimize an infographic exported from NotebookLM.
Part 3. How to Edit NotebookLM Infographic Using Canva Magic Layers
NotebookLM generates text-heavy infographics that Magic Layers often struggles with due to small fonts and complex layouts. However, for simpler graphics, you can try this approach:
-
Export your NotebookLM infographic as PNG or JPEG.
Apply Magic Layers and assess what separated clean.
-
Delete distorted text layers and replace with new Canva text boxes.
-
Rebuild the layout using successfully separated graphic elements.

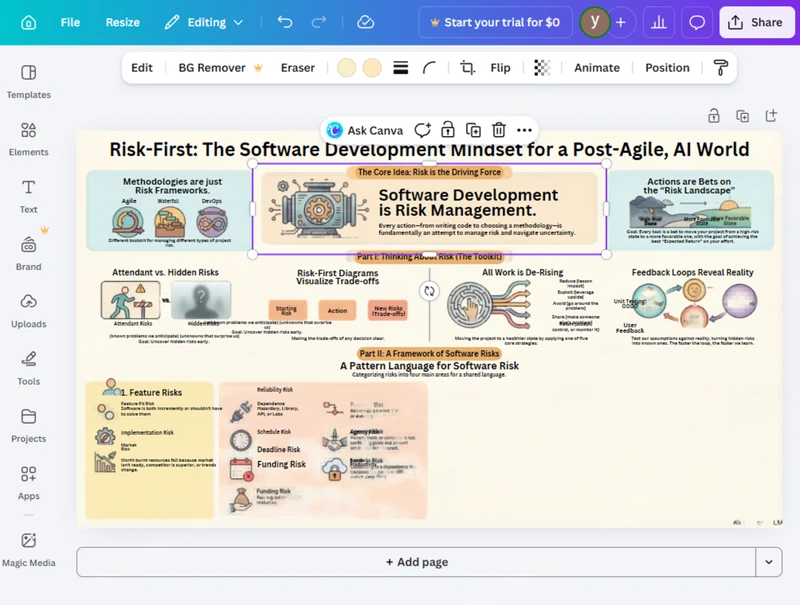
As shown in the image above, Magic Layers struggles with dense text and small fonts—often producing missing characters or blurring—while PDNob delivers clean, editable results with its superior OCR accuracy.
Video Tutorial: How to Edit NotebookLM Infographic in Canva
Quick Tips for Better Results
- Use the show layers in canva shortcut (Ctrl/Cmd + Shift + L) to keep your layers panel accessible.
- Lock layers you’re done editing to avoid accidentally moving them
- If separation looks rough around edges, try a different image with higher contrast—the AI works best with clear subject-background distinction.
Part 4. Limited by Canva Text Issues? Try This Alternative
When Magic Layers cannot handle your text-heavy images, NotebookLM infographics, scanned documents, or PDF-based projects, a specialized alternative provides more reliable results. PDNob PDF Editor offers robust OCR (optical character recognition) technology that accurately extracts and edits text from images and PDFs—addressing the exact weaknesses of Canva Magic Layers.
Unlike Magic Layers, which treats text as visual elements prone to distortion, PDNob's OCR engine is purpose-built for text recognition, delivering clean, editable results even with small fonts, decorative typefaces, or low-contrast text that Canva often misinterprets.
Why PDNob Excels Where Canva Magic Layers Falls Short
- Superior OCR Accuracy: PDNob's purpose-built OCR engine reliably extracts editable text from infographics and scanned documents, while Magic Layers frequently produces missing characters or blurred text.
- Handles Small Fonts and Complex Typography: PDNob accurately recognizes text of any size or font style, unlike Magic Layers which struggles with small or decorative typefaces.
- Multi-Page Document Support: PDNob works with multi-page PDFs and reports, whereas Magic Layers is limited to single images.
- Preserves Original Layout: PDNob maintains tables, columns, and document structure during editing.
- Scanned Document Processing: It converts scanned documents and image-based PDFs into fully editable, searchable text.
How to Edit Text-Heavy Graphics with PDNob (Step-by-Step)
- Step 1: Open PDNob PDF Editor on your computer. Drag your exported NotebookLM infographic into PDNob or click Create PDF → From File.

- Step 2: Click Perform OCR at the top to start text recognition. If required, click Download to install the OCR module. Then select Scan to Editable Text OCR mode, which will extract text and separate infographic elements for editing.
In the interface, locate Document Language and select the language that matches your infographic. If this step is skipped, OCR accuracy can drop significantly, leading to errors or unrecognized text.

- Step 3: Wait for OCR to complete. After processing, the NotebookLM infographic becomes fully editable. You can fix spelling errors, move or resize text boxes, adjust charts, and change headings directly.

- Step 4: When your edits are finished, click Convert and choose your preferred output format: PNG, PowerPoint, PDF, etc.

When to Use pdnob vs. Canva Magic Layers
Quick Decision Guide
- Choose Magic Layers if: You're working with photos, creating depth effects, or need to separate subjects from backgrounds
- Choose PDNob if: Your project contains important text, small fonts, scanned documents, or NotebookLM infographics that Magic Layers distorts.
Part 5. FAQs of How to Use New Magic Layers in Canva
Q1. Is Canva Magic Layers free?
A1: No. It requires Canva Pro, Teams, Education, or Nonprofit. For how to use new magic layers in canva free, try the 30-day Pro trial or use PDNob for text-heavy needs.
Q2. What images work best with Magic Layers?
A2: High-contrast images with clear subjects—portrait photos, product shots against plain backgrounds—produce the cleanest separation.
Q3. Why is my text missing after using Magic Layers?
A3: Magic Layers is designed for photographic images, not text. Small fonts, decorative typefaces, or low contrast cause missing characters or blurring.
Final Thoughts
Mastering how to use new magic layers in canva transforms your design workflow, enabling professional depth effects without external software. Understanding how to layer images in canva and using the show layers in canva shortcut keeps your workflow efficient.
However, Magic Layers has clear limitations with text-heavy content. For NotebookLM infographics, scanned documents, or any project requiring accurate text extraction, PDNob PDF Editor provides a reliable alternative with superior OCR accuracy. By combining both tools, you can handle everything from quick depth effects to complex document editing.


- Make scanned PDFs searchable and editable with 99% OCR precision
- Batch convert PDFs to Word, Excel, PPT, images, PDF/A, Text, EPUB, etc., up to 30% faster
- Edit PDFs easily like Word, including text, images, watermarks, links, and backgrounds
- Annotate PDF with highlights, comments, shapes, stickers, and stamps
- Run smoothly on any PC without lags or crashes, even on low-spec machines
![]() Secure Download
Secure Download
![]() Secure Download
Secure Download
Speak Your Mind
then write your review
Speak Your Mind
Leave a Comment
Create your review for PDNob articles
