How to Edit a Scanned Document in Word?
Recently, I had to scan some documents and email them to my client. I got the idea to use my laptop to edit the scanned pages with my word processing program. I figured I could simply open the scanned document in my word processor, make the edits and save the document. I was wrong. Image files do not open directly in word processing programs. This is because we need to convert image to text or a word-processing file type before they can be opened and edited. I learned it the hard way, but you don't have to; here is how to edit a scanned document in word step by step.
How to scan a document as PDF?
Scanning and editing a document is common to keep your important documents safe. There are several ways to scan a document. Users can use a digital camera, smartphone, scanner or document-scanning service.
Many business owners are already aware of how to scan and edit a document, but here is a quick tutorial for those who aren't.
To begin, open the program that came bundled with your scanner. The main window of this program will display controls for initiating scans, as well as for setting scan options.
To customize your scanning options, click the button or menu item labeled as such. This control may be named "Customize," "Options," or something similar and can usually be found under the "Tools" menu heading.
Once you have located the appropriate control, select the file type you wish to use for saving scans. This control is typically labeled "Type," "Save as Type," or something similar. For this example, we will choose the "PDF" option.
Click on the heading that says "Location" or "Destination," and this will bring up the controls to specify where you would like the PDF outputted.
After you have specified the output location, close all windows except for the main screen. Once you're back on the main screen, click the "Scan" button to scan your document to PDF.
How to edit a scanned PDF document in Word?
Microsoft Word is the most commonly used word-processing software in the world. It is used by people in different fields, such as business, education, and government. A basic step to edit a scanned pdf document is to convert scanned PDF document to Word.
Can you edit a scanned document in Word? Even though it is a complex process, scanning a document and then editing it in Word remains a common use case for many users. This process can be a hassle, especially if you are trying to edit a large document. You will need the MS Word version to be Microsoft 365, Word 2025, Word 2019, Word 2016, Word 2013, Word 2010 or Word 2007. The following is the process of editing a scanned PDF in Microsoft Word.
How to edit a scanned pdf document? To edit a scanned PDF document, you need your PDF to be mostly text and the following instructions
To scan your document and save it as a PDF:
Follow the instructions for your scanner to save the file to your computer
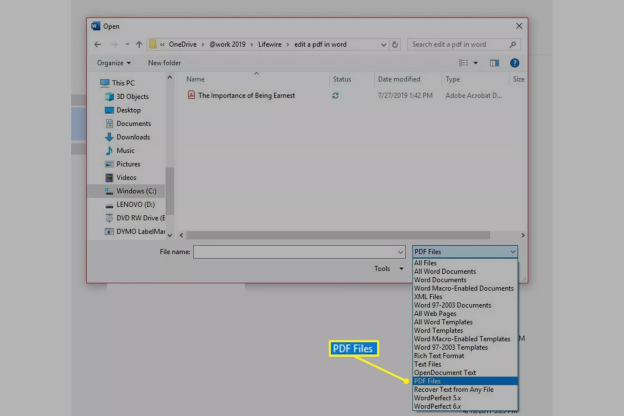
In Word, click file> Open
Browse to the location of the PDF file on your computer and click Open

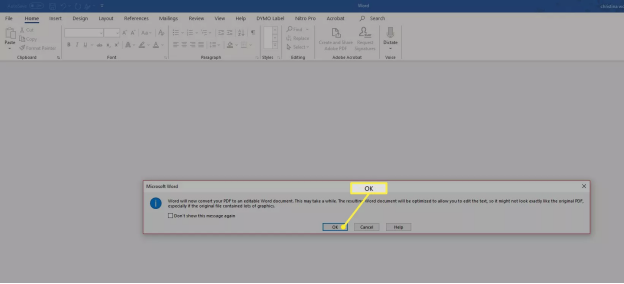
A message will appear stating that Word will convert the PDF file into an editable Word document. Click OK

- For starters, scanned documents tend to be, well, scanned. They may be at a different resolution than the original document, meaning you may notice pixelation.
- The PDF to Word conversion is ideal for files that are mostly text, such as business or scientific documents. However, when you open a PDF in Word, the formatting might not be exactly the same as it was in the PDF.
- If the PDF contains mostly charts or other graphics, the whole page might show up as an image. In this case, the text can't be edited.
- You will need to ensure your document is in the right file type, that you have the right version of Word to edit your document, and that your scan is in good enough condition to scan.
- Sometimes, Word doesn't detect an element from the original PDF file. For example, if Word doesn't recognize a title, it treats the title as regular text and might not place it at the top of the page.
Edit a scanned document using OCR
OCR stands for Optical Character Recognition. OCR is a method to convert scanned text into computer-editable text. Microsoft Word has an OCR feature that allows you to copy the text from a scanned document and paste it into a Word document. This method does not work for all scanned documents.
There are several applications that can help you in your quest on how to scan a document and edit it in Word. One of them is PDNob Image Translator. This software can easily edit a scanned document using the OCR tool.
Edit scanned document free
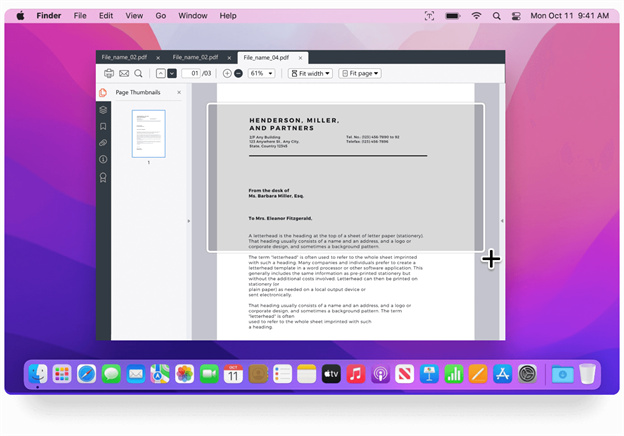
For Windows users, use the shortcut key Ctrl+Alt+Z to run the screenshot function. For Mac users, use the shortcut key Command+1. Then hold down the left mouse button and drag to select the text capture area.

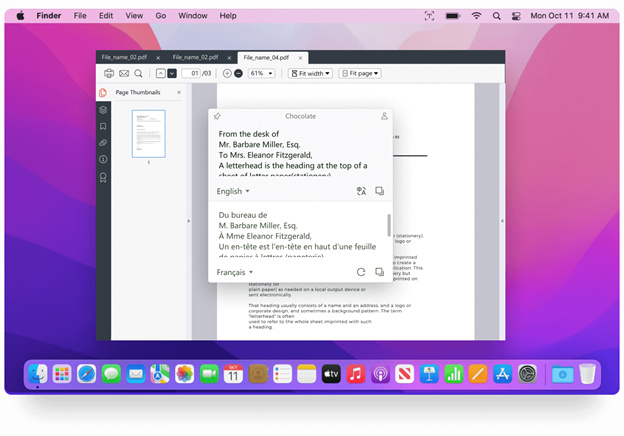
When image OCR recognition is finished, you can check the text on the popup box. The OCR content supports editing and copying.

Wrap up
The steps above tell us how to edit a scanned document in Word. If the first method doesn’t work on editing a scanned document in Word, use PDNob Image Translator. This program is easy to use and can help you make the changes you need to make to the document in a fairly short amount of time.
In conclusion, the steps above are only some of the many you can take in order to make your document look professionally typeset. Rather than settle for a poorly formatted document, take the time to make sure it looks great. You will be glad you did.
PDNob Image Translator
Screenshot to Text Converter allows you to take up to 100 screenshots at a time and convert screenshot to text instantly.


